> Documentation index: [Saleor](/llms.txt) · [This section](/developer/llms.txt)
> Source: https://docs.saleor.io/developer/products/configuration
# Product Configuration guide
## Creating an example product
Let's recreate a sample T-shirt product in Saleor. The product is T-shirt that comes in different sizes, where each size has a different price and length description.
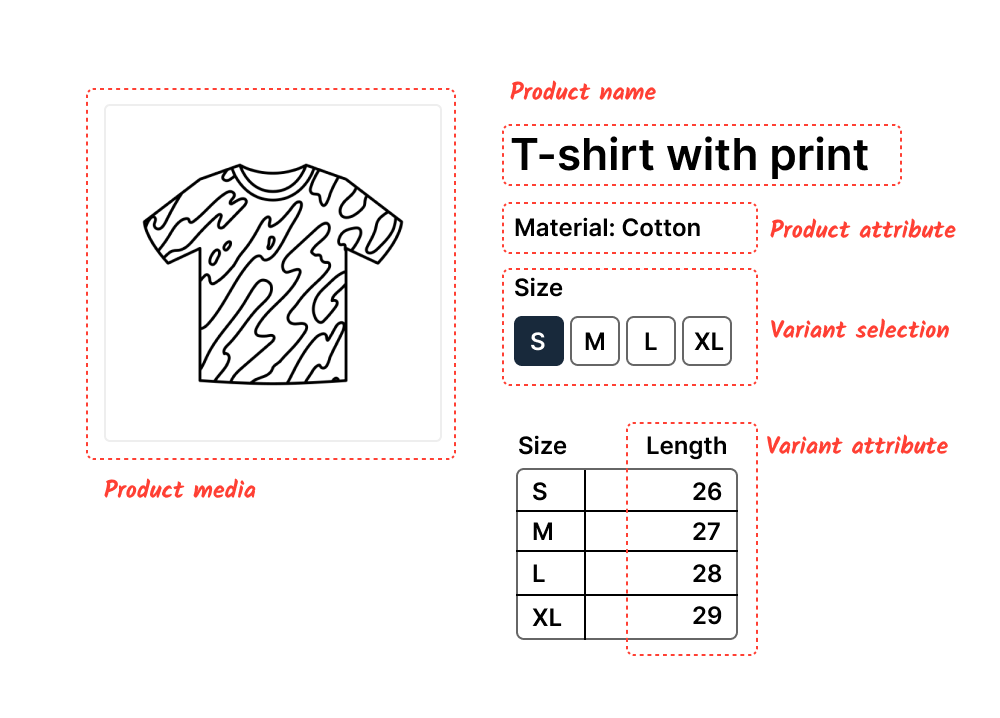
### Attributes
In _Configuration -> Attributes_ Create following _Product Attributes_:
1. Create _Size_ attribute:
- Default label _Size_, which is the value that the storefront can display to shoppers.
- Attribute code _T-shirt Size_ This is the internal name of the attribute for admins and developers to distinguish attributes.
- Assign values _S, M, L, XL, XXL_
- Select _Value is required_, which will ensure that sizes are always specified for each variant.
- We want to make this attribute filterable and visible to shoppers; select _Use as filter_ and _Public_ checkboxes. [Learn more](/developer/attributes/configuration.md).
2. Create _Material_ attribute:
- Default label _Material_, which is the value that the storefront can display to shoppers.
- Attribute code _material\_text_ this is internal name of the attribute for admins and developers to distinguish attributes.
- Select _Plain text_ as the type of the attribute. This would allow you to describe any material or fabric using text.
- This value is optional, so it can be left empty when we will be creating the product.
3. Create _Length_ attribute:
- Default label _Length_, which is the value that the storefront can display to shoppers.
- Attribute code _length\_cm_ is the internal name of the attribute, used by admins and developers to distinguish attributes.
- Select _Numeric_ as the type of the attribute. For the unit, choose _Metric_, _Distance_, and _Centimeter_.
- This value is optional, so it can be left empty when we will be creating the product.
### Product type
In _Configuration -> Product types_ Create a product type:
1. Name the product type _T-shirt_.
2. Assign product attribute **Material**
3. On a variant level, assign attribute **Size** and mark it as a _Variant selection_, indicating that the attribute should be mapped to a variant.
4. On a variant level, add attribute **Length**
5. Select _Shippable_ to require customers to provide a shipping address when purchasing the product; for digital products, this can be left unchecked.
### Category
Create category in _Catalog_ -> _Categories_ named _T-shirts_.
### Product and vairant
Creating the product:
1. Create a product with a type _T-shirt_.
2. Name the product _T-shirt with a print_.
3. Assign the product to the category _T-shirts_.
4. Type _Cotton_ in the _Material_ field.
5. Save the product.
6. Add variants S, M, L, XL, XXL. Each variant can be mapped to a "Size" attribute.
7. To edit the length attribute, open the variant editor and fill in the length description.
### Channel Availability & Pricing
Availability and channels:
1. Assign the product to a channel in the Availability section.
2. Set the product to Published and Available for purchase.
3. After completing the steps above, the `Variants` section will allow you to `Turn on Availability` and `Price` for the respective channel.
### Stock
Update stocks for variant:
1. Select warehouses for variants and set stock.
2. Enable track inventory if you want Saleor to automatically reduce stocks after each order.
note
For reference you can use sample dataset to explore existing product catalog configurations.
info
To learn how to create products using only the API, follow [these instructions](/developer/products/api.md#create-products).
## Availability
Channel availability can be controlled both on product and variant levels. Variants can overwrite the product's availability settings, but if the channel is not available on the product level, it will not be available for any variant.
- Product level availability:
- Products can be assigned to channels to make them visible to the storefront. When a product is unassigned from a channel, variant data for that channel, like pricing and availability, will be lost.
- Product can be set to `Published` or `Not published` to control visibility in Storefront; the difference compared to the channel assignment is the following:
1. Publish date can be scheduled
2. Channel-specific variant data will not be lost when the product is unpublished.
3. Variants can be assigned to the channel even if the product is not published.
- `Available for purchase` controls if the product can be added to the cart and purchased.
- `Hide in product listings` can hide the product from the category and search. Products will be visible in collections.
- Variant level availability:
- Variants can only be assigned to channels assigned to the parent product.
- Variants not assigned to any channel will not be visible to the channel even if the parent product is.
## Media
The media gallery is saved on a product level and shared across all variants, allowing you to upload and assign a single image to multiple variants.
- **Thumbnails:** Saleor automatically generates images in different formats and sizes; see [thumbnail settings](/developer/thumbnails.md).
- **Image attributes:** To add specific media slots to products or variants, see [attributes](/developer/attributes/overview.md). For example, it can be useful to have a dedicated image for the product description section.
- **Sorting:** Images can be sorted in the product gallery. Sorting on a variant is currently not supported but can be achieved with [image attributes](/developer/attributes/overview.md) as they are sortable.
## Taxes
Assign tax class that is used to calculate taxes for the product. Learn more about [Taxes](/developer/taxes.md).
## Collections and categories
Products can be assigned to a single category or multiple collections.
### Categories
Categories provide a hierarchical structure for organizing products.
To create catgory go to **Catalog** -> **Categories** or use API mutation [`categoryCreate`](/api-reference/products/mutations/category-create.md).
When configuring categories, you can:
- **Create nested hierarchies:** Build parent-child relationships (e.g., Clothing → T-shirts → Graphic Tees) to reflect your catalog's structure and support intuitive navigation.
- **Set SEO fields:** Configure SEO titles, descriptions, and slugs for each category to optimize storefront discoverability and search engine ranking.
- **Add images:** Assign background or representative images to categories for branding and visual merchandising.
- **Localize content:** Provide translations for category names, descriptions, and SEO fields to support multiple languages and international storefronts.
Each product is assigned to a single category, which defines its primary place in the catalog and affects navigation, filtering, and SEO structure.
### Collections
Collections are flexible, flat groups for curating products outside the main category tree.
To create collection go to **Catalog** -> **Collections** or use API mutation [`collectionCreate`](/api-reference/products/mutations/collection-create.md).
When configuring collections, you can:
- **Create collections for any purpose:** Group products for campaigns, promotions, featured selections, or custom merchandising (e.g., "Summer Sale", "New Arrivals").
- **Assign products flexibly:** Add any product to one or more collections, regardless of its category.
- **Custom sort products:** Reorder products within each collection to highlight featured items or control display order.
- **Set channel visibility:** Create collections per sales channel and manage their publication and visibility independently for each channel.
- **Configure SEO and branding:** Set collection names, descriptions, SEO fields, and featured images to enhance marketing and search performance.
- **Localize content:** Translate collection names, descriptions, and SEO fields for multilingual storefronts.
Collections offer a powerful way to merchandise products dynamically, experiment with groupings, and support marketing initiatives without altering the main catalog structure.
## Default product fields
All fields are optional and can be substituted with custom attributes.
**SEO** – used for web storefronts, alternatively product pages can use product data to automate metadata or use a mix of both.
**Description** – Rich text in the format of [editorjs.io](https://editorjs.io/).
**Metadata** – Can be used for unstructured data and logs, mostly aimed for API usage.
## Variant settings
**Checkout limits** – Variants can be limited to a specific number of items per checkout. Note that this will not restrict customers for adding several orders with the same variant.
**Weight** – Shipping rates can be mapped to weights to calculate shipping prices.
**Stock** – Stock is set per warehouse and has limited public visibility. Learn more about [stock tracking](/developer/stock/stock-allocation.md).
warning
To make a variant available for purchase, a warehouse must always be assigned to both the variant and the channel.
**Track inventory** – Disable automated stock tracking, [see more](/developer/stock/stock-allocation.md). When disabled, the stock needs to be updated via API.
**SKU** – Stock Keeping Unit, a unique identifier for the variant that is used for inventory management. This field can follow any format.
**Pricing** – The price can be set at the channel level with a dedicated currency. Prices can be set as Selling Prices intended for customers and Cost Prices, which are optional and only used for internal purposes.
**Default variant** — Optional setting. Useful in some scenarios when storefronts need to display a specific variant by default.
**Sorting variants** – Variants can be sorted for cases when the order of variants is important in the storefront.
**Variant attributes** – `Dropdown attribute` can be configured as a variant selection, meaning the attribute will be mapped to a variant.