> Documentation index: [Saleor](/llms.txt) · [This section](/developer/llms.txt)
> Source: https://docs.saleor.io/developer/app-store/apps/avatax/configuration
# AvaTax App Configuration
## Prerequisites
Before you begin, ensure you have met the following requirements:
- You have created a [Avalara](https://www.avalara.com/) account.
- You have installed the Taxes App.
## Configuration
The AvaTax configuration form consists of three sections: _Credentials_, _Settings_, and _Address_.
Each configuration must have _Instance name_ - it is used to identify it across all the views.
### Credentials
Fields needed to authenticate the instance:
- Username - the username for the AvaTax account. You will generate it in the Avalara dashboard (_Settings_ → _License and API keys_ → _License key_).
- Password - the password for the AvaTax account. You will generate it in the Avalara dashboard (_Settings_ → _License and API keys_ → _License key_).
- Company code - the [company code](https://developer.avalara.com/ecommerce-integration-guide/sales-tax-badge/transactions/simple-transactions/company-codes/) for the AvaTax account.
- Sandbox - a flag that indicates whether the instance should use [the sandbox environment or the production environment](https://developer.avalara.com/erp-integration-guide/sales-tax-badge/authentication-in-avatax/sandbox-vs-production/).
### Settings
Fields that affect the created transactions:
- Autocommit - a flag that indicates whether the instance should [automatically commit the transactions](https://developer.avalara.com/communications/dev-guide_rest_v2/commit-uncommit/).
- Shipping tax code - the [tax code](https://taxcode.avatax.avalara.com) for shipping.
- [Document recording](#document-recording) - a flag that indicates whether the instance should [record the transactions](https://developer.avalara.com/ecommerce-integration-guide/sales-tax-badge/designing/disable-document-recording/).
- [Tax exemption status metadata](#tax-exemption-status-metadata) - a flag that indicates whether the app should write information about applied tax exemption to checkout and order public metadata.
#### Document recording
AvaTax App creates AvaTax transactions on two events:
- while calculating taxes (in order or checkout)
- while confirming an order
When calculating taxes, the default [document type](https://developer.avalara.com/avatax/dev-guide/transactions/document-types/) is `SalesOrder`. It makes the transaction temporary and not visible in the Avalara dashboard.
In the case of order confirmation, the default document type is `SalesInvoice`. It makes the transaction permanent and visible in the Avalara dashboard.
The AvaTax configuration form in the AvaTax App contains _Document recording_ toggle. When switched off, it changes all the document types to `SalesOrder`. This effectively stops the "document recording", making all the transactions temporary.
#### Tax exemption status metadata
When enabled, the AvaTax App will write information about tax exemption applied by AvaTax to the checkout and order **public metadata**, under the `avataxExemptionStatus` key.
This metadata is intended to be consumed by storefronts or other clients to display additional UI (for example, a "tax exempt" badge).
note
The metadata is only written when tax exemption is applied. If tax exemption is not applied, the `avataxExemptionStatus` metadata key will be removed.
### Address
Fields that describe the address of the company.
After entering, the address must be verified by clicking the _Verify_ button that triggers AvaTax [address validation](https://developer.avalara.com/avatax/address-validation/). In response, AvaTax returns the validated address the user has to review. After either applying or rejecting suggestions, you can save the configuration.
## Mapping transaction fields
When an order is confirmed, the Taxes App [creates a transaction in AvaTax](https://developer.avalara.com/api-reference/avatax/rest/v2/methods/Transactions/CreateTransaction/). The transaction contains fields that are mapped from the webhook payload. For several fields, you can provide custom values with [`metadata`](/api-usage/metadata.md#private-and-public-metadata). You have to make sure to set the value before confirming the order (e.g. when the order is still a draft or in checkout).
The mutation for setting the metadata is:
```graphql
mutation UpdateMetadata {
updateMetadata(
id: "OBJECT_ID"
input: { key: "METADATA_KEY", value: "METADATA_VALUE" }
) {
item {
metadata {
key
value
}
}
}
}
```
where `OBJECT_ID` is the id of the updated object, `METADATA_KEY` is the key of the supported mapping, and `METADATA_VALUE` is the value for that field.
Taxes App supports the following mappings:
### Document code
**Metadata key: `avataxDocumentCode`** **Object: `Order`**
By default, the [document code](https://developer.avalara.com/erp-integration-guide/sales-tax-badge/transactions/cert-document-codes/) is set to be equal to Saleor [`order`](/api-reference/orders/objects/order.md) number.
If you want to override it, you can do so by providing a value for the order `metadata` field `avataxDocumentCode`.
caution
Due to AvaTax API restrictions, the document code will be sliced to be under 20 characters.
### Entity type
**Metadata key: `avataxEntityCode`** **Object: `Order` or `Checkout`**
AvaTax supports [`entityUseCode`](https://developer.avalara.com/erp-integration-guide/sales-tax-badge/designing/entity-code/) field that represents the type of customer the transaction is assigned to. The field is then used to determine the taxability of the transaction.
Let's say you have a draft order that was filled by tax-exempted US government entity. In AvaTax, the code for a "FEDERAL\_GOV" entity is "A".
To map the entity type, you need to provide the value for the `entityUseCode` field of the order `metadata` field of key `avataxEntityCode` and the value of "A".
### Tax calculation date
**Metadata key: `avataxTaxCalculationDate`** **Object: `Order`**
By default, the [tax calculation date](https://developer.avalara.com/erp-integration-guide/sales-tax-badge/transactions/cert-tax-calc-date/) is set to be equal to the order creation date from Saleor [`order`](/api-reference/orders/objects/order.md).
If you want to override it, you can do so by providing a value for the order `metadata` field `avataxTaxCalculationDate`.
info
The value of the `avataxTaxCalculationDate` field must be a valid UTC date-time string.
### Customer code
**Metadata key: `avataxCustomerCode`** **Object: `Checkout` or `Order`**
You can add `avataxCustomerCode` to your user `Checkout` or `Order` metadata. AvaTax app will then send it as the [customer code](https://developer.avalara.com/erp-integration-guide/sales-tax-badge/transactions/simple-transactions/customer-codes/). If you don't specify `avataxCustomerCode` [a dummy customer code will be used](https://developer.avalara.com/ecommerce-integration-guide/sales-tax-badge/transactions/simple-transactions/).
important
You have to make sure that `avataxCustomerCode` is set on `Checkout` or `Order` metadata as soon as possible (prefereably before tax calculation). This ensures that futher tax calculations are using customer code specified in `avataxCustomerCode` metadata value.
DEPRECATED
Alternatively, you can add `avataxCustomerCode` to the `User` metadata. If the user is logged in, the AvaTax app will use the user's id as the customer code. If the user is not logged in a dummy customer code will be used. **Sending customer code as an entry inside user metadata won't work for [CheckoutCalculateTaxes](/api-reference/taxes/objects/calculate-taxes.md) webhook.**
### Discounts
When the AvaTax app is handling checkout or order calculate taxes webhooks it is using:
- _Automatically distributed discounts_ for lines containing products
- _Price reduction discounts_ for shipping line
You can read about AvaTax discounts strategies [here](https://developer.avalara.com/erp-integration-guide/sales-tax-badge/transactions/discounts-and-overrides/discounting-a-transaction/).
It means the App will perform following mapping:
- Each product line will be marked as `discount: true`, but the amount of the line will not be modified.
- Shipping line will be marked as `discount: false`, but it's amount will be reduced by the shipping-type discount
- App will sum every discount of "subtotal" type and send the calculated value to AvaTax as `discount` field
For more information about how discounts work in Saleor see discounts [guide](/developer/discounts/overview.md) from our docs.
### Ship-from address override
**Metadata key: `avataxShipFromAddress`**
**Object: `Checkout` or `Order`**
**Storage: private metadata**
By default, the AvaTax app uses the address configured in the AvaTax app settings as the `shipFrom` address when calculating taxes.
You can override the `shipFrom` address per checkout or order by setting **private metadata** with key `avataxShipFromAddress`. The value must be a JSON object where **all fields are strings**, including the zip code:
- `street` (string)
- `city` (string)
- `state` (string)
- `zip` (string, not a number)
- `country` (string, 2-letter ISO country code, for example `US`)
Example private metadata entry:
```json
{
"key": "avataxShipFromAddress",
"value": "{\"street\":\"123 Custom Street\",\"city\":\"Custom City\",\"state\":\"CA\",\"zip\":\"90210\",\"country\":\"US\"}"
}
```
To set this value from Saleor, use the `updatePrivateMetadata` mutation and pass the checkout or order ID:
```graphql
mutation UpdateShipFromAddressPrivateMetadata {
updatePrivateMetadata(
id: "OBJECT_ID"
input: [
{
key: "avataxShipFromAddress"
value: "{\"street\":\"123 Custom Street\",\"city\":\"Custom City\",\"state\":\"CA\",\"zip\":\"90210\",\"country\":\"US\"}"
}
]
) {
item {
privateMetadata {
key
value
}
}
errors {
field
message
}
}
}
```
Where:
- `OBJECT_ID` is the ID of the `Checkout` or `Order` object.
- The `value` is a JSON-encoded string containing the ship-from address.
note
This override is evaluated when AvaTax calculates taxes. Make sure the `avataxShipFromAddress` private metadata is set before the relevant tax calculation (for example, before updating delivery method or completing the checkout).
caution
Use **private metadata** for this field. Private metadata is not exposed in the public GraphQL API and is only available to staff users and apps, which helps keep address details hidden from storefront clients.
### Tax exemption status
**Metadata key: `avataxExemptionStatus`**
**Objects: `Checkout`, `Order`**
**Storage: public metadata**
When the _Tax exemption status metadata_ option is enabled in the AvaTax App configuration, the app will update the checkout and order public metadata entry with key `avataxExemptionStatus`.
The metadata value is a JSON string with the following fields:
- `exemptAmountTotal` (number)
- `entityUseCode` (string, optional)
- `calculatedAt` (string, ISO date-time)
Example metadata entry:
```json
{
"key": "avataxExemptionStatus",
"value": "{\"exemptAmountTotal\":123.45,\"entityUseCode\":\"A\",\"calculatedAt\":\"2026-01-14T12:34:56.000Z\"}"
}
```
To read it from Saleor, you can query the checkout or order `metafield`:
```graphql
query CheckoutExemptionStatus($id: ID!) {
checkout(id: $id) {
id
avataxExemptionStatus: metafield(key: "avataxExemptionStatus")
}
}
```
```graphql
query OrderExemptionStatus($id: ID!) {
order(id: $id) {
id
avataxExemptionStatus: metafield(key: "avataxExemptionStatus")
}
}
```
## Troubleshooting
### "I configured the app, but the tax value is 0"
Creating an AvaTax provider and assigning it to a channel ends the app configuration process. The taxes should be calculated automatically from now on.
If that doesn't happen, it may be an expected AvaTax behavior. There are several reasons why AvaTax can return 0 as the tax value and they are all described in the "[Reasons Tax Can Be Zero](https://developer.avalara.com/erp-integration-guide/sales-tax-badge/transactions/exemptions/reasons-tax-can-be-zero/)" article.
The most frequent cause is not setting up the tax residence in the Avalara dashboard. The process is described in the "[Update where you collect and pay tax](https://knowledge.avalara.com/bundle/dqa1657870670369_dqa1657870670369/page/Update_where_you_collect_and_pay_tax.html)" article of the [Avalara Knowledge Center](https://knowledge.avalara.com/).
Another possibility is the wrong tax code mapping. Some tax codes are non-taxable, so taxes calculated for this line will be `0`.
In other cases, please [file an issue](https://github.com/saleor/apps/issues/new) in the App Store repository.
### Checking tax calculation in AvaTax dashboard
You can check why the taxes were calculated in a certain way in the AvaTax dashboard. Once the Checkout is completed and converted into an Order it will be visible in AvaTax under the Transactions tab.
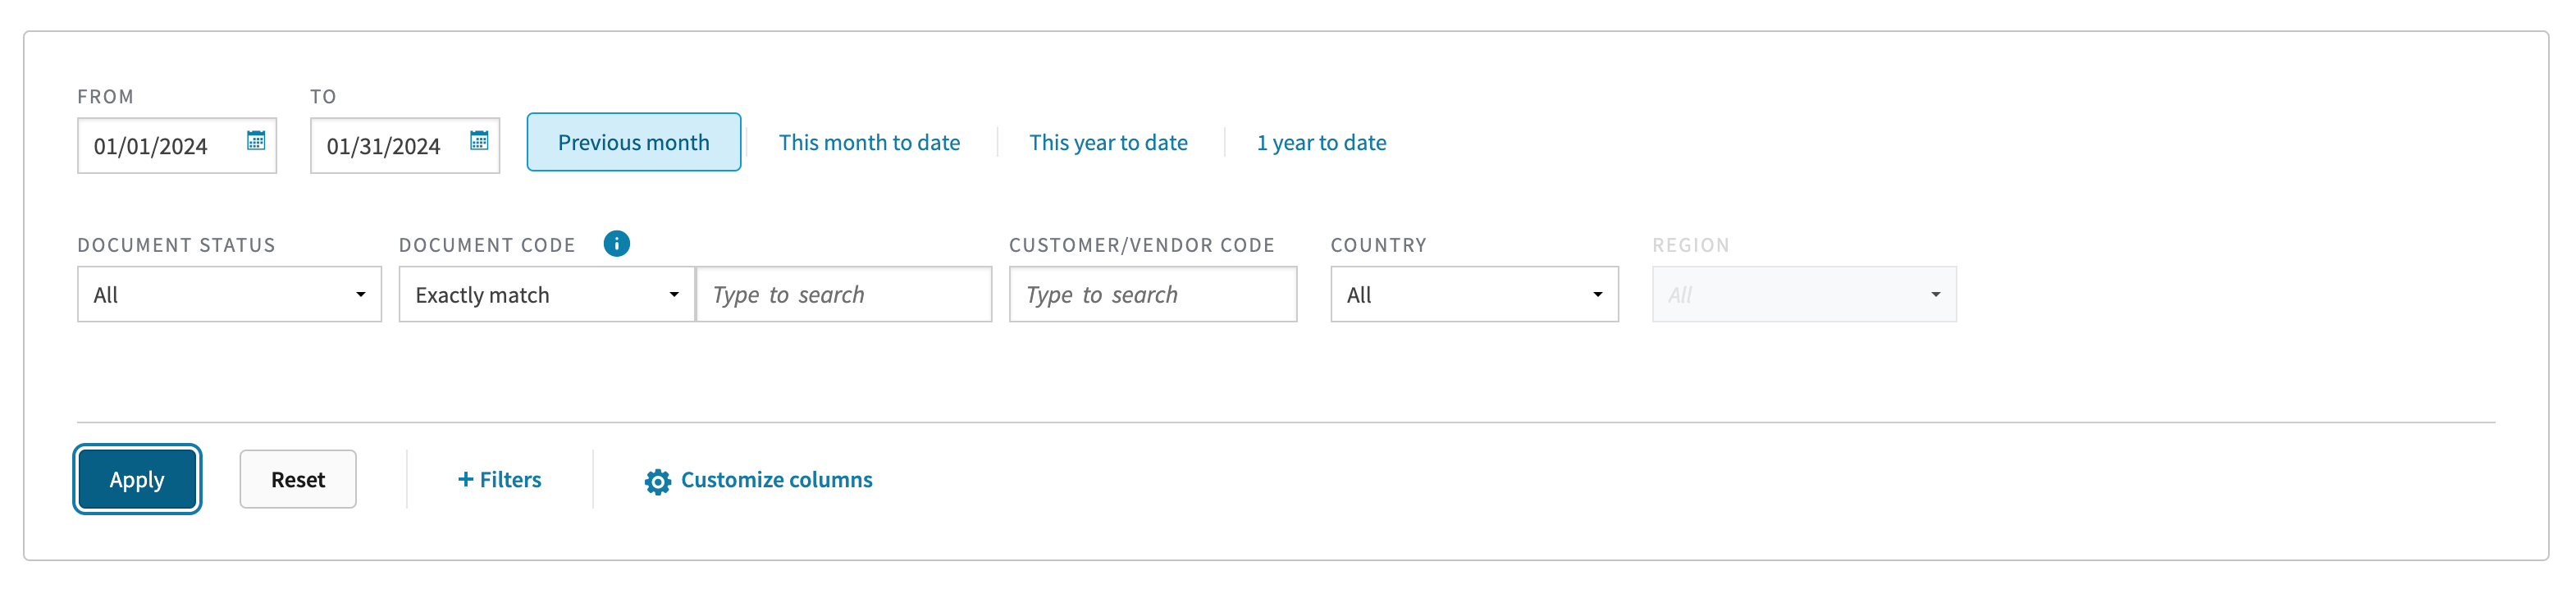
To see the latest Order make sure to select **"This month to date"**, country **"All"** from the list, and hit **"Apply"** button:
note
The following screenshots were taken in February 2024, it might not reflect the current state of the AvaTax dashboard.
From the list choose Invoice with **"Doc code"** set to the **Order ID**
info
Please note that the ID in AvaTax will be shorter than Order's ID in Saleor, due to AvaTax limitations
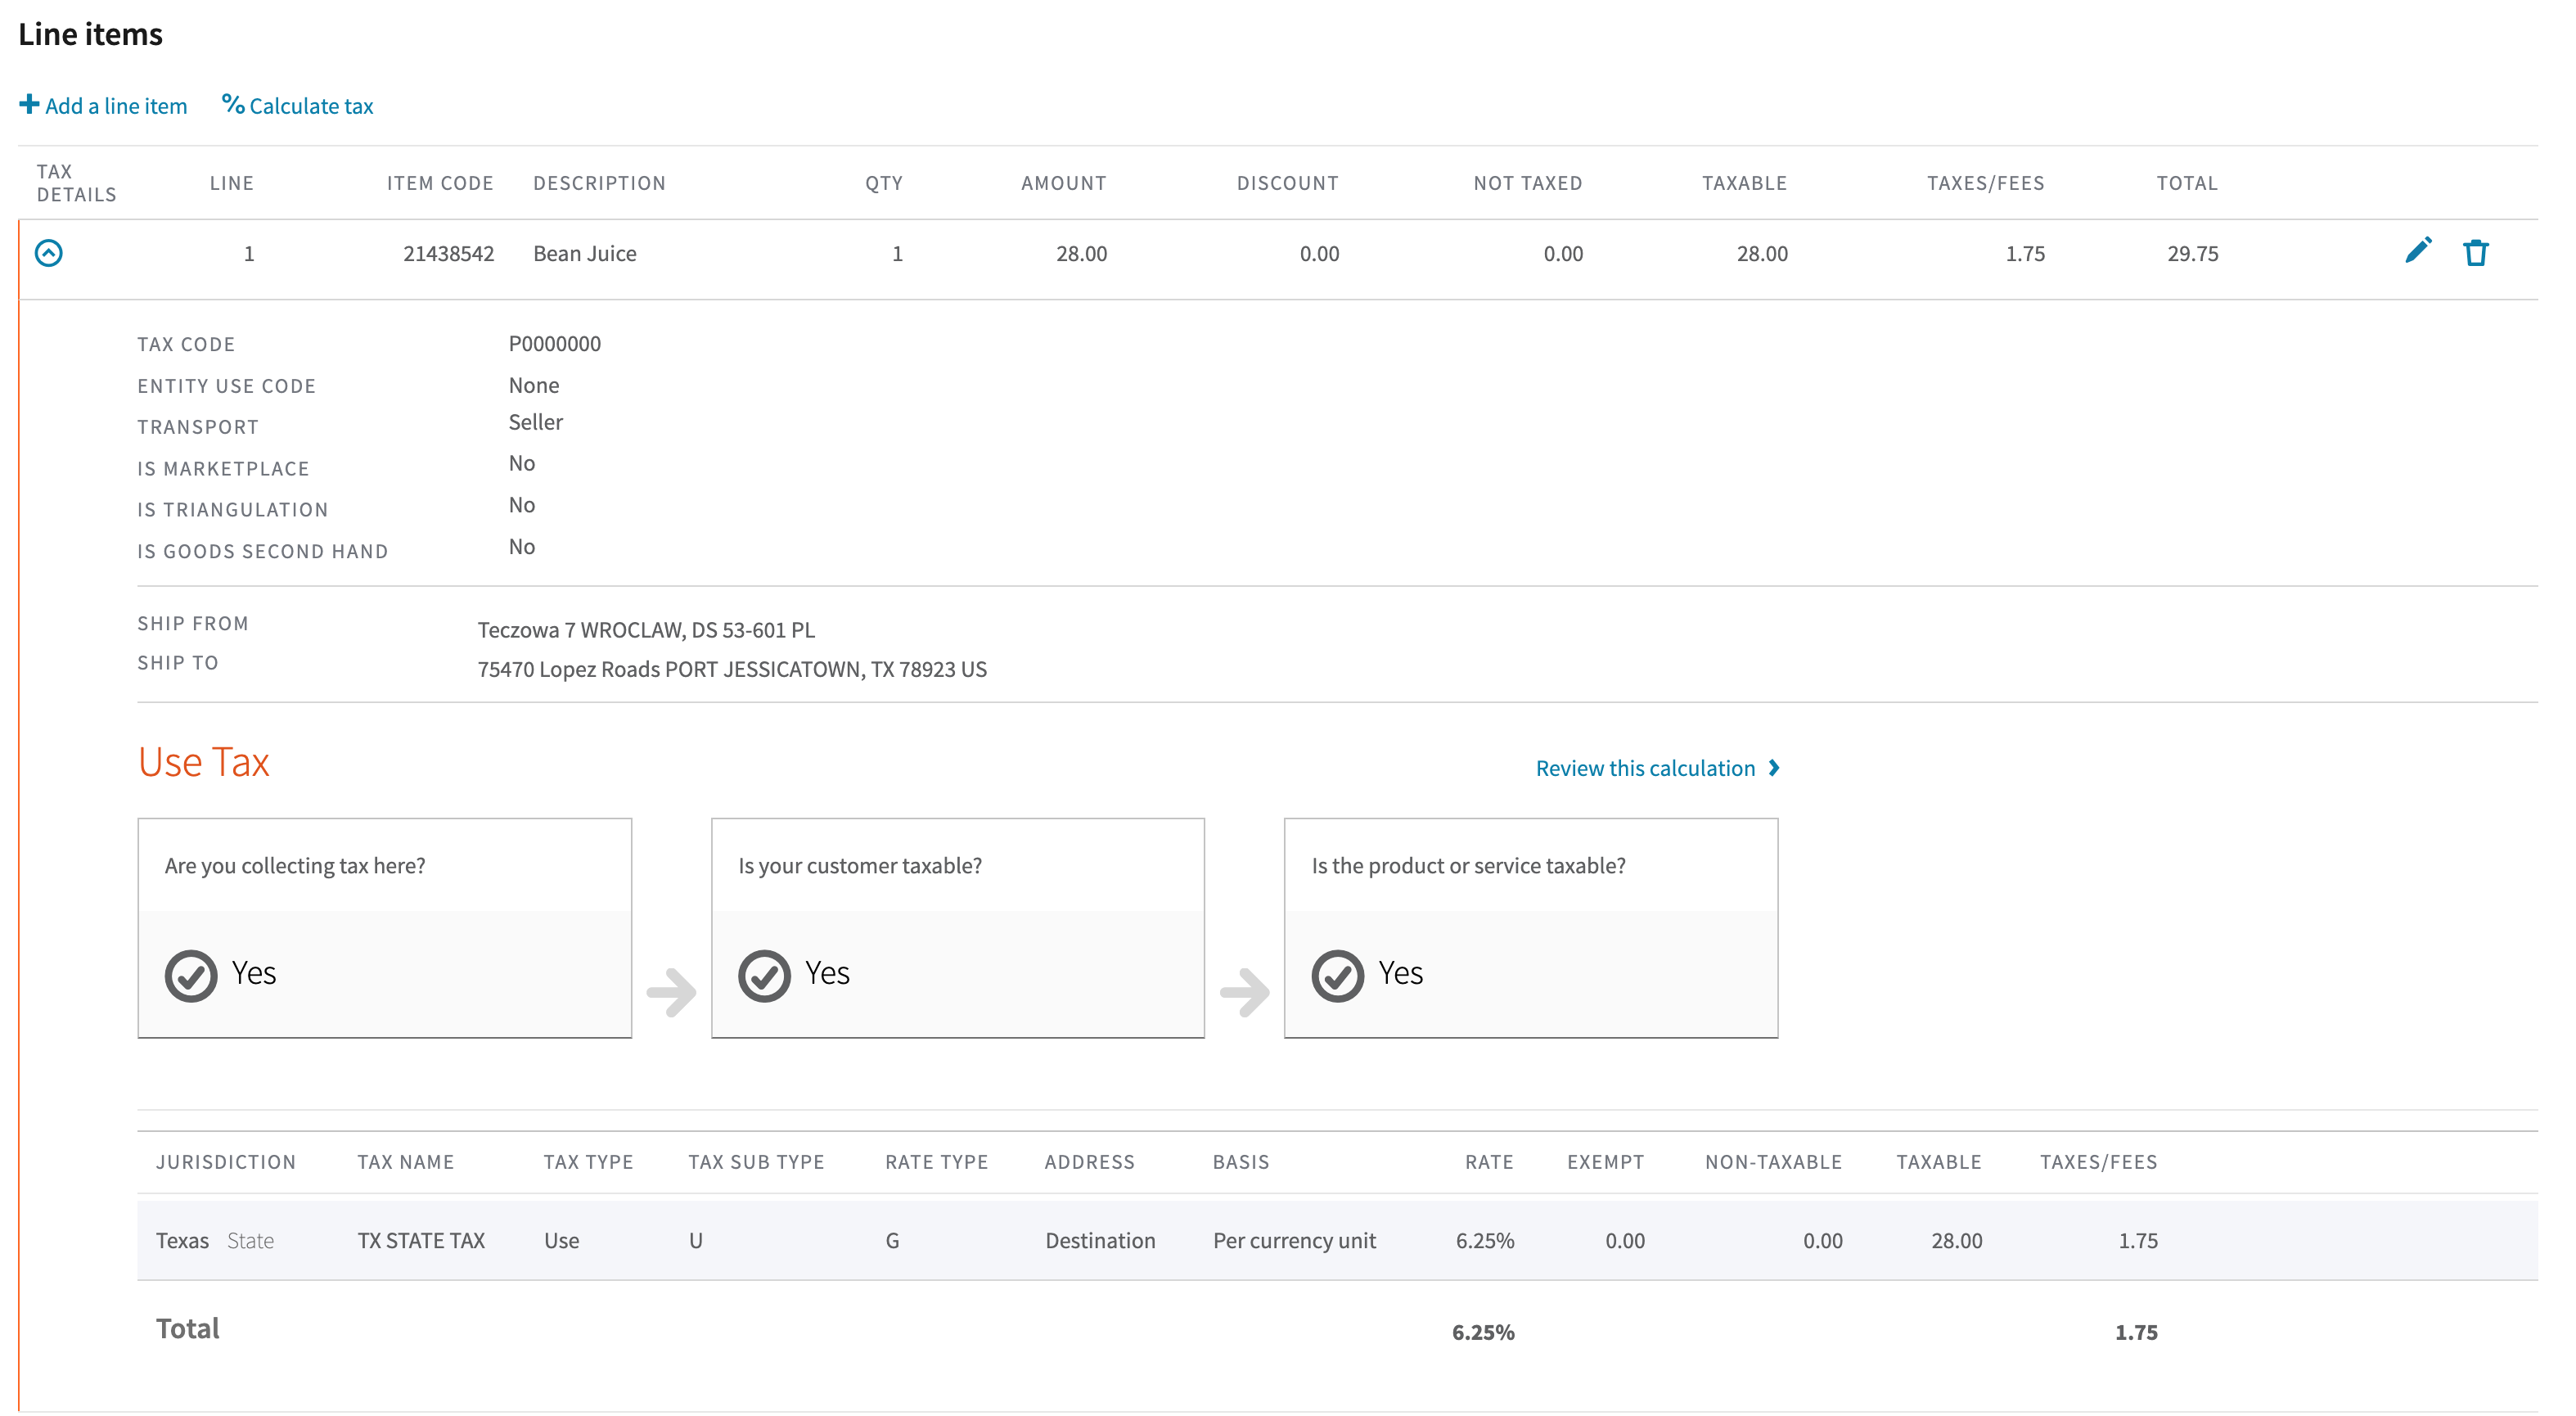
The invoice will have line items from the Saleor order. Clicking on a line item will reveal more details about the taxes:
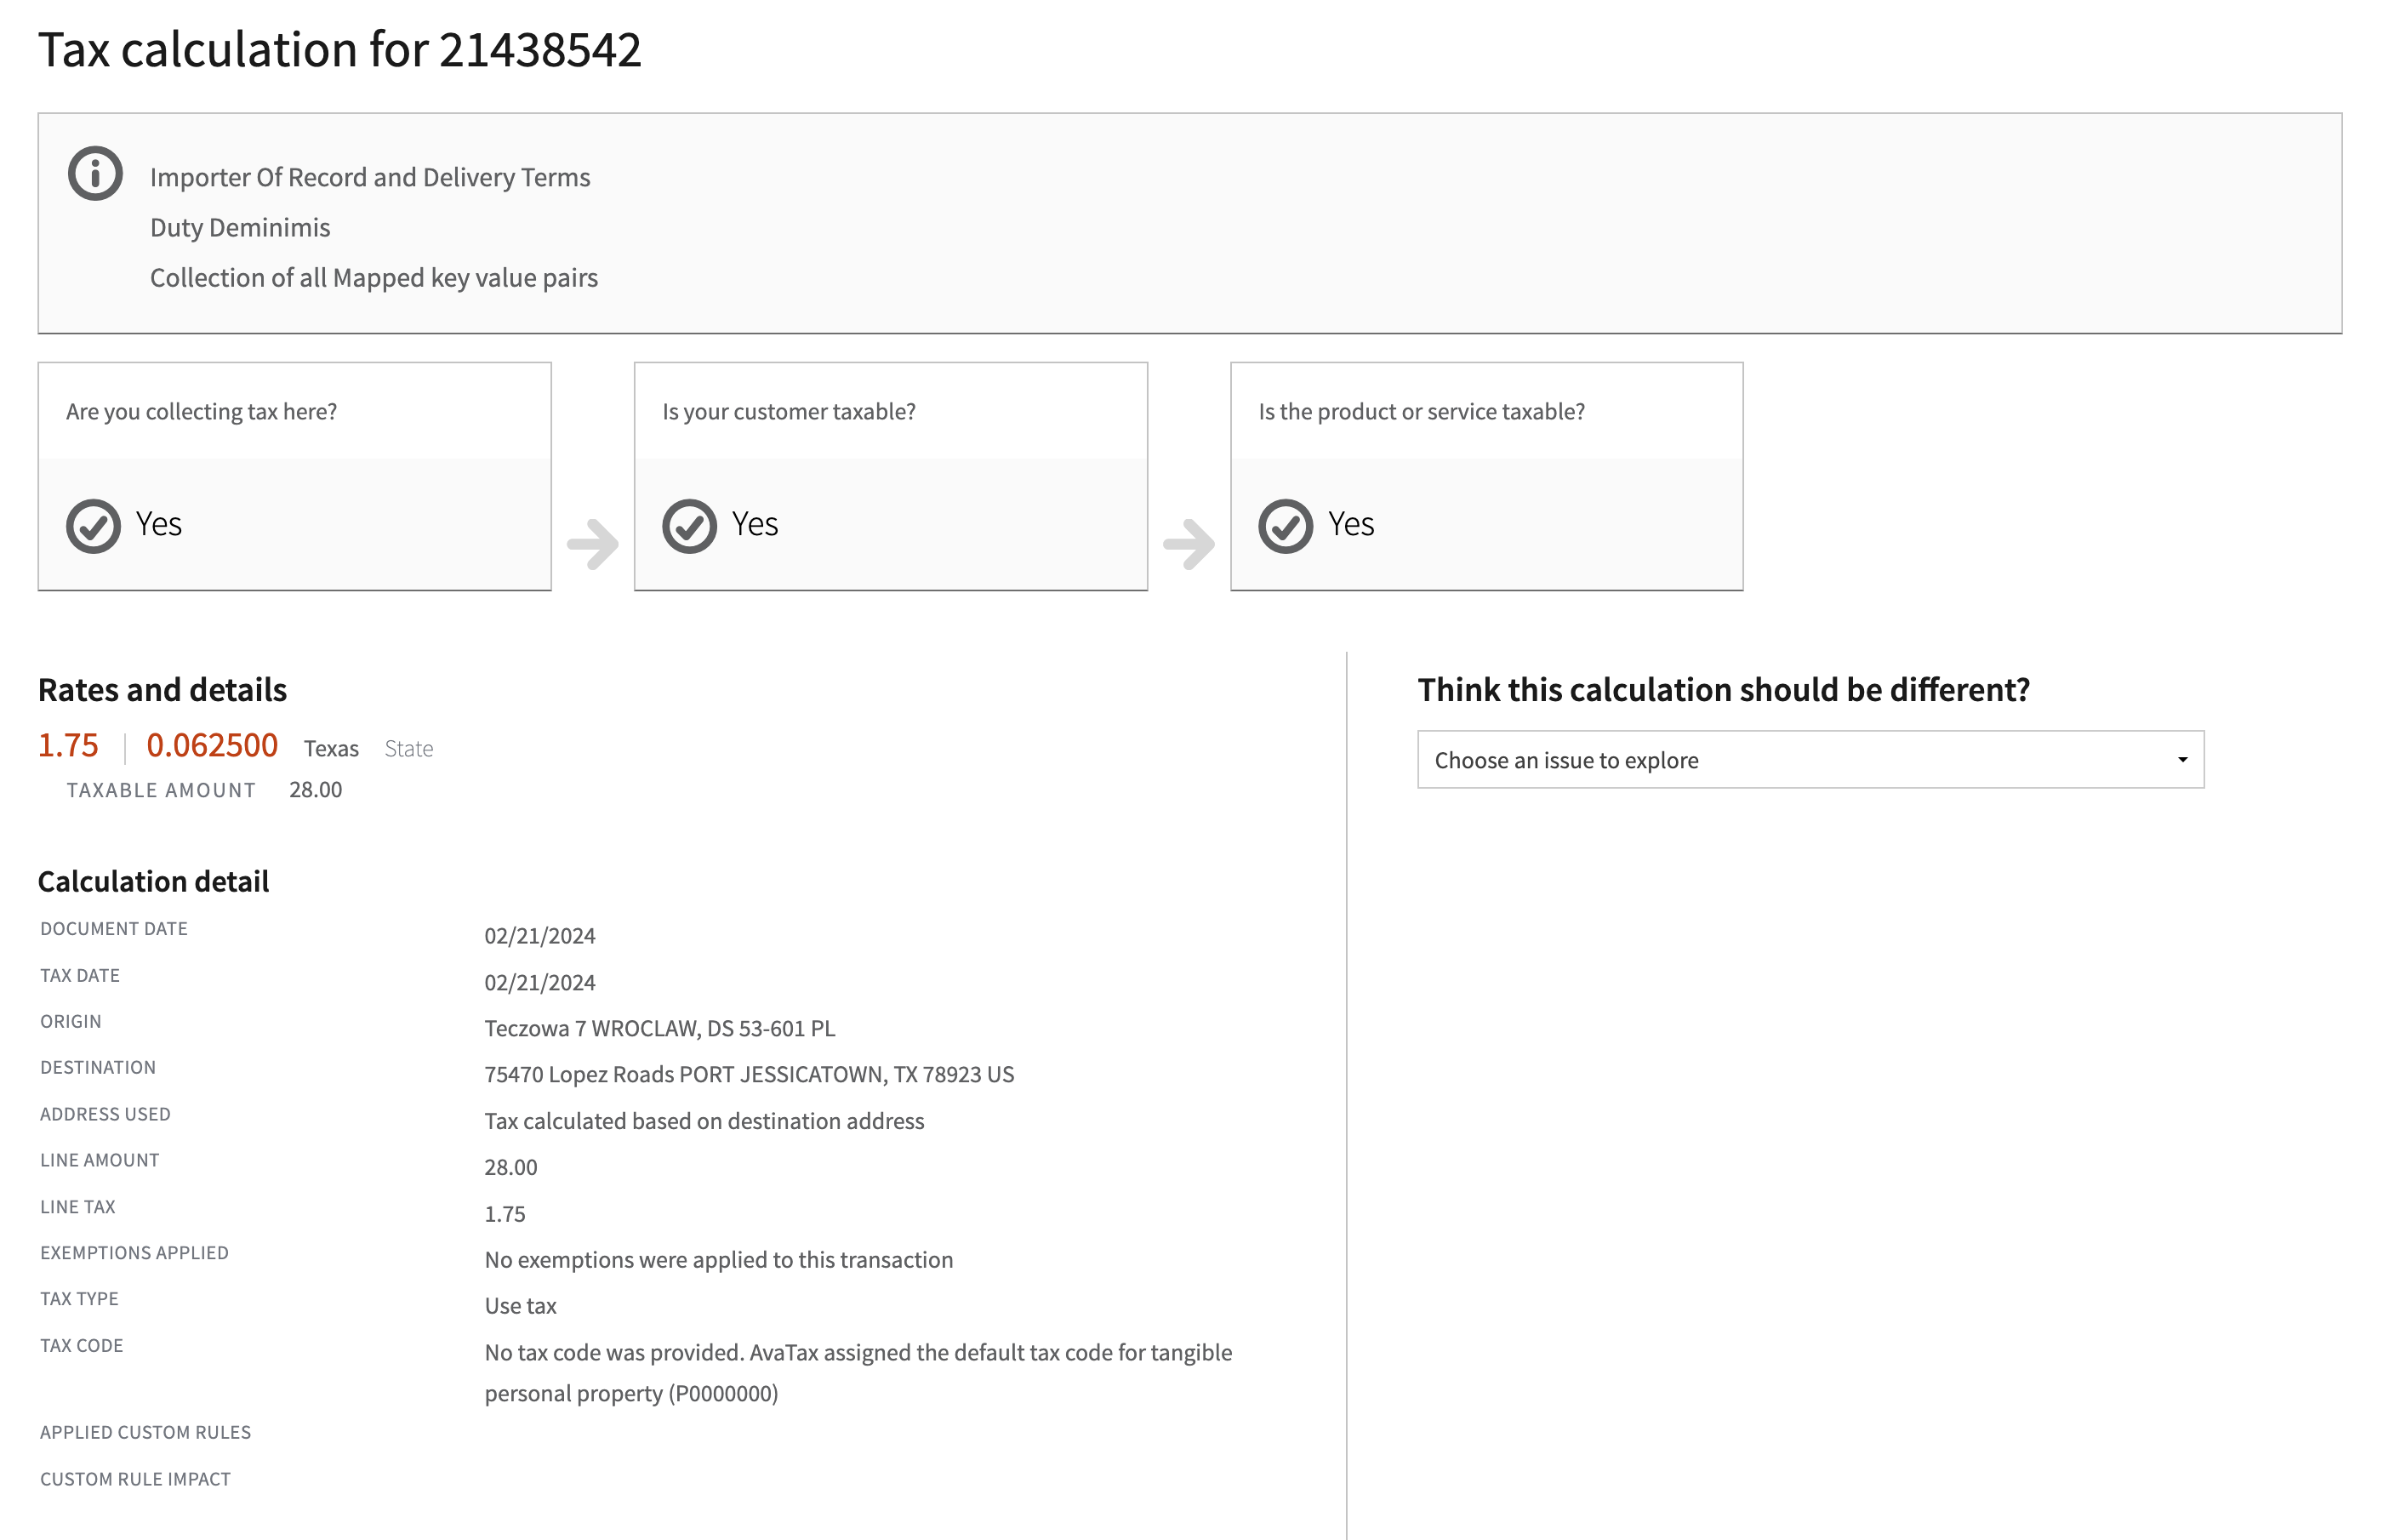
Clicking **"Review this calculation"** will show more details about taxes calculation including custom rules, tax type, address used for calculation, exceptions applied, etc.:
## Best practices
### Learn how to setup multiple tax configurations
If your use case requires you to have multiple AvaTax configurations, create multiple providers within a single AvaTax app. You can then assign a provider to the relevant channels. Avoid installing a second AvaTax app.
### Don't request tax fields if they are not needed
If your application or integration doesn't require the `TaxedMoney` type field, avoid adding it to the GraphQL subscription or query. This way, Saleor won't send unnecessary webhook requests to the AvaTax app for tax calculations, making your integration faster. For example, you can skip taxes information in "Cart" views and mutations modifying its contents, and only request such information during the checkout process.
### Store customer code on Checkout or Order metadata
Use `avataxCustomerCode` on Checkout or Order metadata instead of the `User`. This ensures that `avataxCustomerCode` is passed to AvaTax for tax calculation.